
Configure Point Grey / FLIR GigE (Blackfly) Cameras
For configuring the camera settings please see this article: How to use Point Grey / FLiR USB cameras with Swing Catalyst
This article covers setting up the IP addresses of both the camera & network card.
Camera support is limited, and camera control is limited to the FlyCapture (Point Grey software).
Compatible network adapters & configuration:
Please see: gige-network-setup.md
For Spinnaker SDK supported cameras see our Spinnaker article.
Important for performance: If you have an Intel network card, please download & install the Intel drivers, as this will give you options to set interrupt moderation rates, which may be unavailable with the Windows drivers.
To jump straight to the IP configuration click here
Region of Interest (ROI) does not work on the Blackfly BFLY-PGE-03S3C cameras.
We recommend one dedicated network adapter (port) per camera.
Setting up your Point Grey / FLIR GigE Camera:
Requirements:
Install the Point Grey Flycap software from our website: https://www.swingcatalyst.com/drivers
One of our recommended network cards
Network card is installed and is receiving power.
Camera is connected to the network card.
When installing Flycap, please make sure the checkbox for the Point Grey Image Filter driver is selected.
Installing the network card
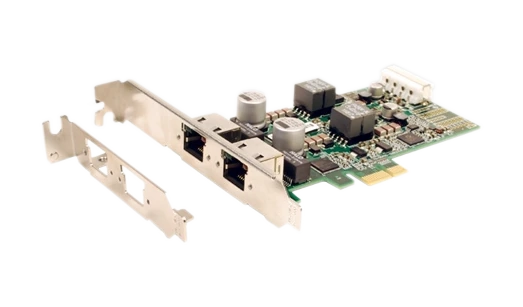
To install the network card please consider looking at the steps provided here: https://www.wikihow.com/Install-a-PCI-Card the steps to install the dual port network card by FLiR is roughly the same.
Setting the IP addresses using the GigE Configurator utility
We need to configure the IP addresses for both the network adapter (port) and the connected camera.
Lets start by setting up the network adapter!
- Open the Point Grey GigE Configurator application. It can be found in: C:\Program Files\Point Grey Research\FlyCap2 Viewer\bin64
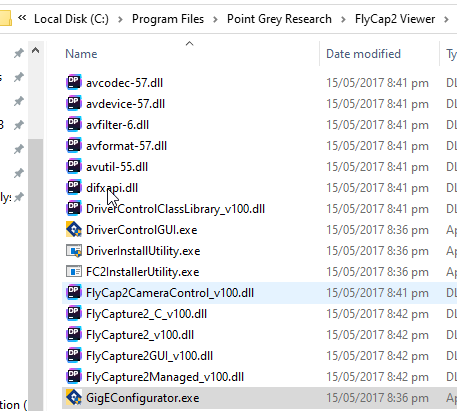
- Open up the Point Grey GigE Configurator application and click on the camera.
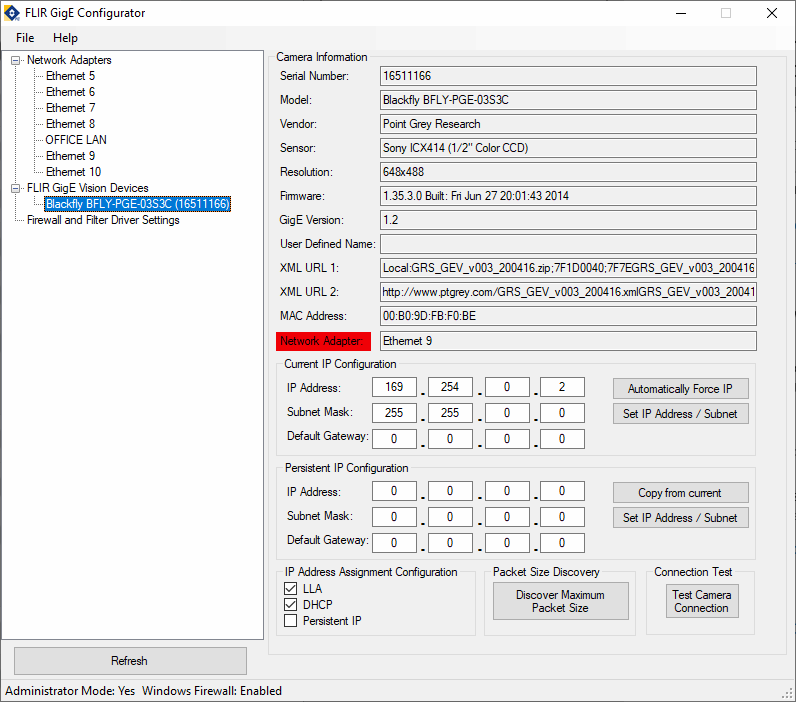
Please note which network adapter the camera is connected to (see highlighted in red).
In our case the camera is connected to Ethernet 9.
Click on Ethernet 9 under Network Adapters in the list as shown on the left of the above screenshot.
Setting the IP address of the network adapter:
Change the IP address and subnet mask to match the screenshot below, and click Set IP address / Subnet then click Yes and OK.
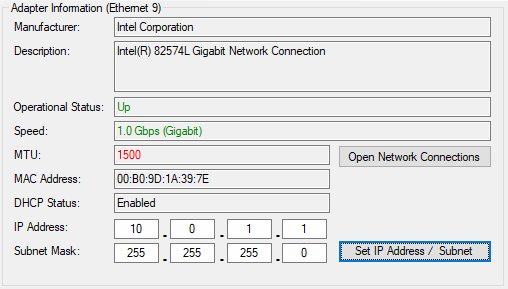
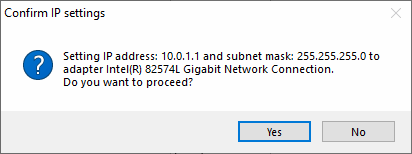
Now we have set the IP address of the first network adapter. The next step is to optimize the settings of the network adapter.
Optimizing the network adapter
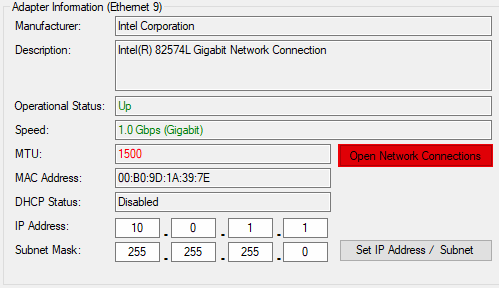
Per the screenshot below please note the number in red called MTU
We need to increase this number. Click Open Network Connections per the highlighted area below.
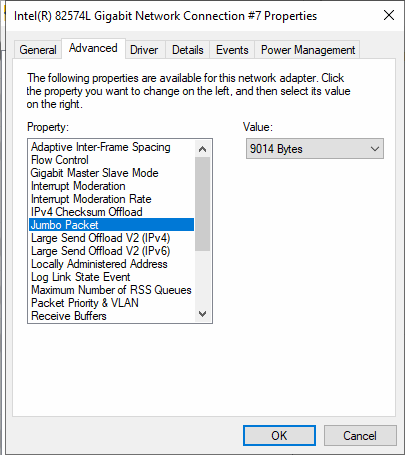
Click on the Advanced tab and locate Jumbo Packet and set the value to 9014 Bytes.
Changing the Interrupt Moderation
Set Interrupt Moderation to Enabled
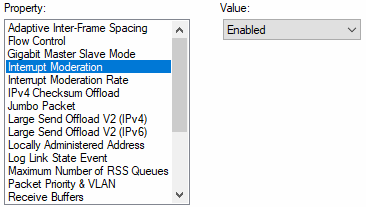
Click Interrupt Moderation Rate and set the Value to Extreme.
Important: If you’re going to use more than 2 cameras might have to set Interupt Moderation to Disabled to avoid dropped frames.
Setting the IP address of the camera
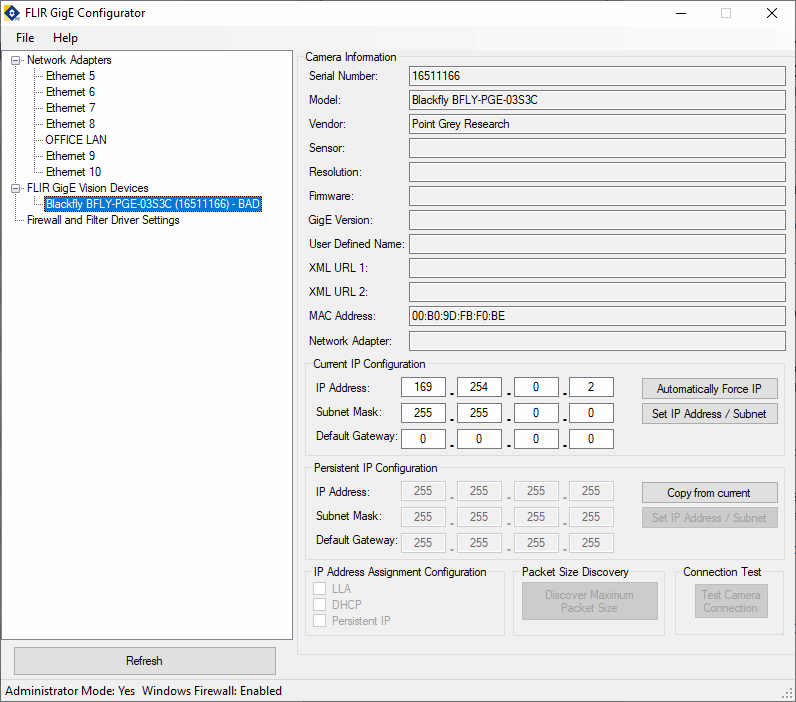
Click on the camera available in the list (in our case we only have one camera connected so we know it is the right camera).
Enter the following IP (note we setting the IP address of the camera connected to Ethernet 9 per above):
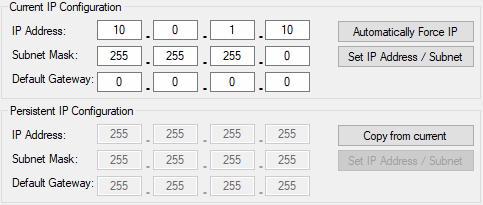
Click Set IP Address / Subnet and click Yes then OK.
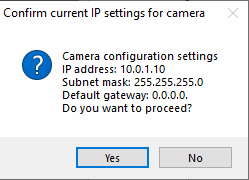
Find the camera you just set the IP address of in the list of the left hand side of the FLiR GigE Configurator and click on it.
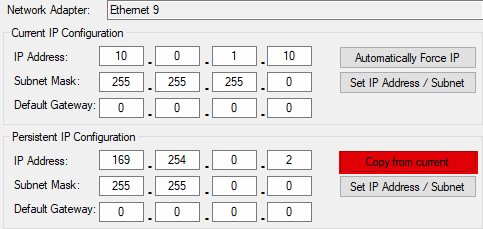
Setting the IP Address Assignment Configuration
This is important to do as we need the IP address changes on the cameras to be persistent, otherwise the camera will forget it’s configuration after a power loss.
Uncheck DHCP and check Persistent IP
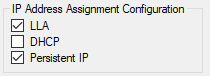
Click Copy from Current and then Set IP Address / Subnet
Verify packet size
Lets verify that the packet size (MTU) was set correctly.
Click Discover Maximum Packet Size, it should say 9000.

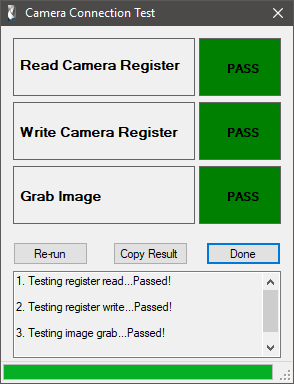
Click Test Camera Connection to verify that the connection is working and that you’re receiving data from the camera.
Setting up more than 1 camera
Now that you’re configured one camera and one network adapter you can repeat the steps above to configure multiple cameras.
With the steps and screenshots above in mind, we’ve already set the IP of the camera and Ethernet Adapter 9, setting up multiple cameras follows the same procedure just with different IPs.
For simplicity’s sake, lets call it Ethernet Adapter 1, 2 and 3 and so on..
Ethernet Adapter 1:
IP: 10.0.1.1
Subnet: 255.255.255.0

Camera 1:
IP: 10.0.1.10
Subnet: 255.255.255.0

Ethernet Adapter 2:
IP: 10.0.2.1
Subnet: 255.255.255.0

Camera 2:
IP: 10.0.2.10
Subnet: 255.255.255.0

Ethernet Adapter 3:
IP: 10.0.3.1
Subnet: 255.255.255.0

Camera 3:
IP: 10.0.3.10
Subnet: 255.255.255.0

Ethernet Adapter 4:
IP: 10.0.4.1
Subnet: 255.255.255.0

Camera 4:
IP: 10.0.4.10
Subnet: 255.255.255.0
Using the camera(s) in Swing Catalyst
Current versions of Swing Catalyst do not load FlyCapture (Point Grey) cameras by default. For Spinnaker-compatible cameras such as the Blackfly S, follow Setting up FLIR Blackfly S GigE . Contact Swing Catalyst support for older cameras that need FlyCapture.
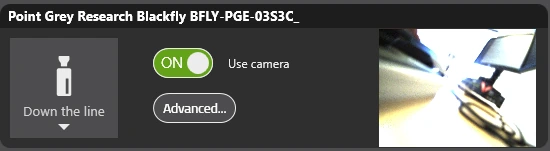
When the camera is loaded, set the camera angle and switch Use camera on. Click the Play button to make sure the camera works.
All camera configuration needs to be done through Point Grey’s FlyCapture Software.
How to change the shutter speed & other camera settings
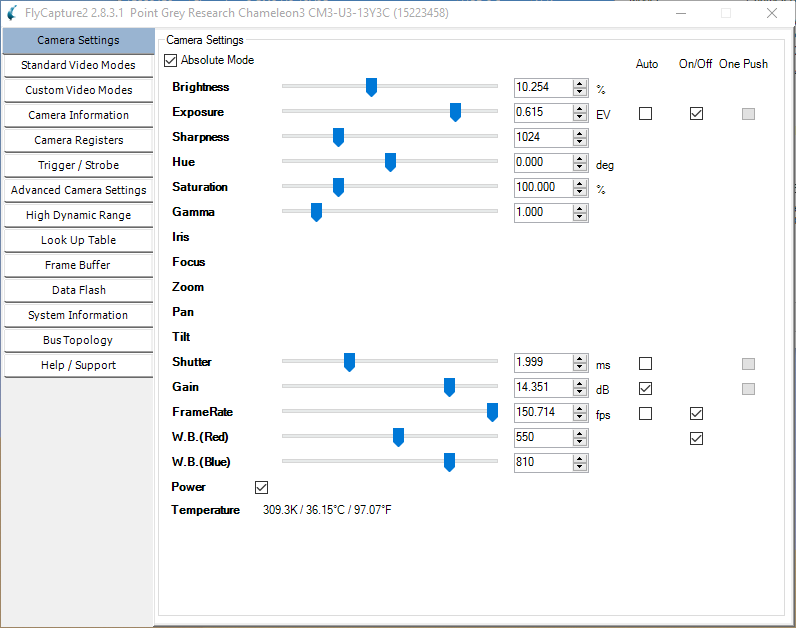
Start the Point Grey Flycap2 software and navigate to Camera Settings.
- Under shutter, makes sure the Auto is unchecked.
It’s usually best to use a manual exposure for static environments, such as indoor studios. A fully auto exposure can cause the frame rate to be changed and lead to an inconsistent image.
- In this case we’re not using auto exposure as we want to be able to control this ourselves. Generally an exposure time less than 2000 (2ms) is recommended.
To save settings see 3.
It may also be necessary to adjust the frame rate, you can uncheck auto and set it to what your desired frame rate, then follow step 3.
It may also be necessary to adjust the frame rate, you can uncheck auto and set it to what your desired frame rate, then follow step 3.
Setting gain values
Similar to exposure, setting the gain to manual for static / indoor lighting conditions is best. The higher the gain, the more grainy the image will be and the longer the video encoding will take vs low gain.
To set manual gain, uncheck Auto.
Please see this article on how to setup the camera: How to use Point Grey / FLiR USB cameras with Swing Catalyst
Troubleshooting and further optimizations
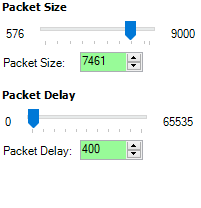
If you’re dropping frames, or having problems with sync with your FLiR / Point Grey camera’s please check the packet size under Flycapture2 -> Custom Video modes.
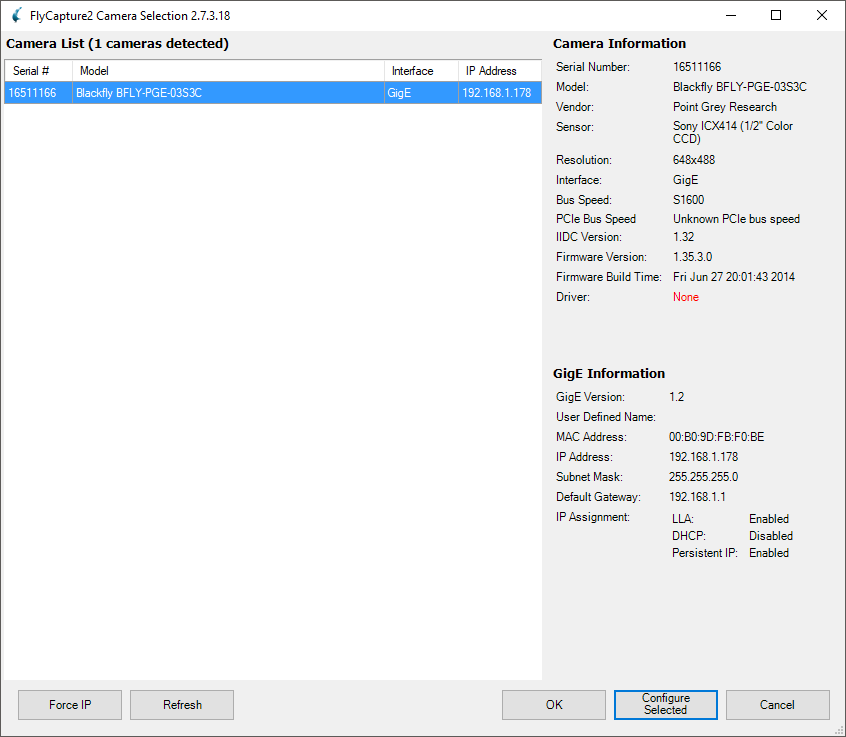
You can try turning down the packet size from the maximum of 9000, down to smaller value. Depending on your CPU, what works best may vary depending on the computer.
If using 2 cameras on one network adapter it is recommended to set the packet delay to: 9500.
Remember to go to Advanced Camera Settings, and save the settings to bank 1 as covered by the camera setup article, How to use Point Grey / FLiR USB cameras with Swing Catalyst
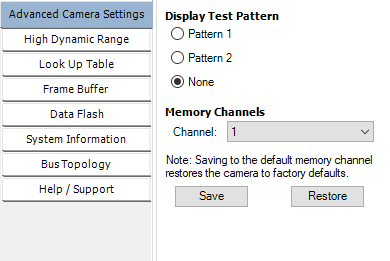
Remember to click save under Memory Channels and make sure Channel 1 is selected!
If you are not getting any image or you’re receiving an error in Swing Catalyst, please try changing the packet size and saving to bank 1 (as per picture above)
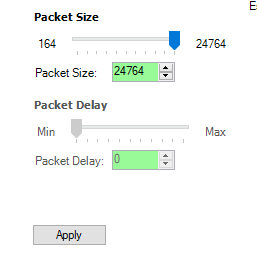
4 camera setup dropping frames:
In some 4 camera setups it is recommended to turn off interrupt moderation, or change the interrupt moderation rate from extreme to low. If the moderation rate is high, the amount of interrupts will be suppressed, which leads to a lower CPU load. However, the less often the interrupt happens, the more likely the ACK response from the host will be slow. This may result in dropped packets if you are streaming images at fast frame rate.
Choosing a different moderation depending on your system can improve network and system performance.
You can read more about this under Interrupt Moderation Rate section in this article: Troubleshooting image consistency errors .
For more detailed information please see FLiR / Point Grey’s support article on dropped frames: https://eu.ptgrey.com/tan/10899
Please see https://www.ptgrey.com/support/downloads/10113/ for Point Grey’s technical reference manual for the Blackfly camera model.
Further network adapter optimizations
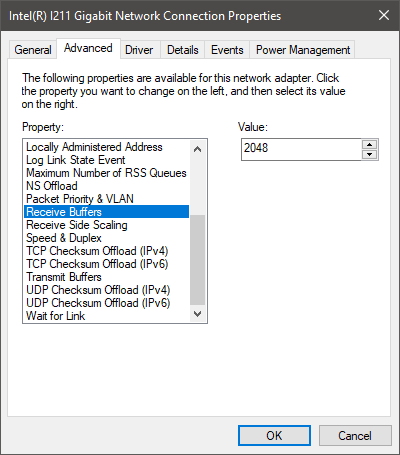
Receive Buffers
It’s recommended to set this value as high as it can go. This can help avoid dropped frames when using multiple camera’s & or higher resolution GigE camera’s.
Using two cameras on a network switch:
Please note, only the Blackfly BFLY-PGE-03S3C (90FPS) camera is supported. Using other cameras may result in dropped frames.
Important: The network switch must support 9KB Jumbo Frames (most networking switches do support this), we recommend the: https://www.netgear.com/support/product/GS105.aspx switch or similar switches to the GS105 model.
If you are to use a network switch it’s important that the Packet Delay is set to 9500 as per the screenshot below.
After setting Packet Delay to 9500, go to Advanced Camera Settings & save to bank 1, as covered by the camera setup article, How to use Point Grey / FLiR USB cameras with Swing Catalyst
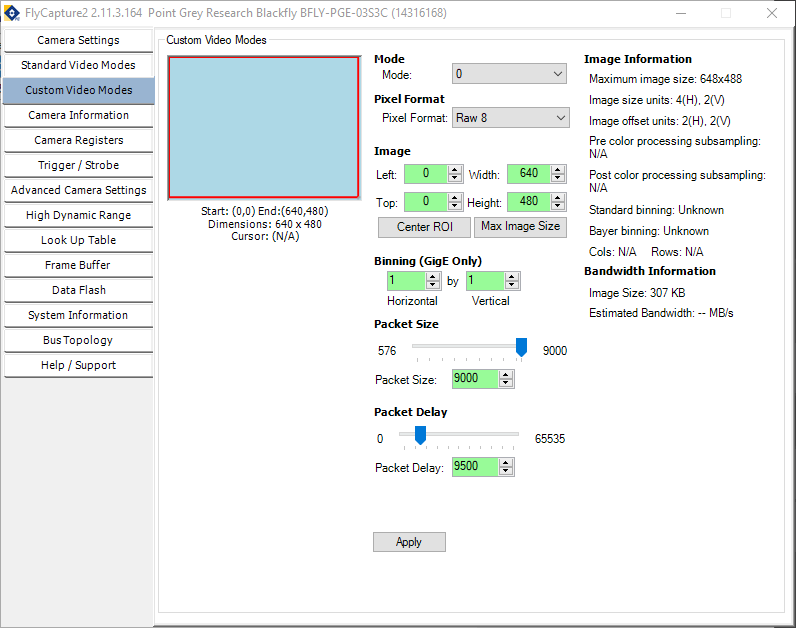
Setting the Packet Delay helps with dropped frames when using two Blackfly 03S3C camera’s on one network adapter.
More in depth details on a multiple camera setup can be found here: https://www.ptgrey.com/tan/10351